本文主要介绍 macOS 环境下使用 iterm2 的 rz(上传)和 sz(下载)功能的安装流程,某些时候这些小命令可以方便的代替 scp 绕过安全限制执行简单的上传和下载任务,同理 SecureCRT 和 Xshell 也可以启用 rz 和 sz 功能。亲测可用!
lrzsz 是什么
lrzsz is a unix communication package providing the XMODEM, YMODEM ZMODEM file transfer protocols. lrzsz is a heavily rehacked version of the last public domain release of Omen Technologies rzsz package, and is now free software and released under the GNU General Public Licence.
lrzsz 原理
-
下载文件
在服务器上执行 sz(Send by ZMODEM),先在终端上输出 **B00000000000000,然后客户端在终端发送指令,表示拒绝,还是接收(接收的话,就在客户端运行 rz 指令与服务端交互) -
上传文件
在服务器上执行 rz(Receive by ZMODEM),先在终端上输出 rz waiting to receive.**B0100000023be50,然后客户端发送指令,表示取消,还是上传(上传的话,在客户端运行 sz 命令与服务端交互)。
可以看到在上述流程中,对 Terminal 的要求就是,遇到特殊指令,触发对应的操作(执行本地命令)
由于 macOS 自带的 Terminal.app 不支持这个,所以网上大部分教程都是使用 iTerm2安装 lrzsz
命令行输入命令:
brew install lrzsz
安装执行脚本
将 iterm2-send-zmodem.sh 和 iterm2-recv-zmodem.sh 保存到 /usr/local/bin 目录下。
iterm2-send-zmodem.sh
#!/bin/bash
# Author: Matt Mastracci (matthew@mastracci.com)
# AppleScript from http://stackoverflow.com/questions/4309087/cancel-button-on-osascript-in-a-bash-script
# licensed under cc-wiki with attribution required
# Remainder of script public domain

osascript -e 'tell application"iTerm2"to version' > /dev/null 2>&1 && NAME=iTerm2 || NAME=iTerm
if [[ $NAME = "iTerm" ]]; then
	FILE=$(osascript -e 'tell application"iTerm"to activate' -e 'tell application"iTerm"to set thefile to choose file with prompt"Choose a file to send"' -e "do shell script (\"echo \"&(quoted form of POSIX path of thefile as Unicode text)&\"\")")
else
	FILE=$(osascript -e 'tell application "iTerm2" to activate' -e 'tell application "iTerm2" to set thefile to choose file with prompt "Choose a file to send"' -e "do shell script (\"echo \"&(quoted form of POSIX path of thefile as Unicode text)&\"\")")
fi
if [[ $FILE = "" ]]; then
	echo Cancelled.
	# Send ZModem cancel
	echo -e \\x18\\x18\\x18\\x18\\x18
	sleep 1
	echo
	echo \# Cancelled transfer
else
	/usr/local/bin/sz "$FILE" --escape --binary --bufsize 4096
	sleep 1
	echo
	echo \# Received"$FILE"
fi
iterm2-recv-zmodem.sh
#!/bin/bash
# Author: Matt Mastracci (matthew@mastracci.com)
# AppleScript from http://stackoverflow.com/questions/4309087/cancel-button-on-osascript-in-a-bash-script
# licensed under cc-wiki with attribution required
# Remainder of script public domain

osascript -e 'tell application"iTerm2"to version' > /dev/null 2>&1 && NAME=iTerm2 || NAME=iTerm
if [[ $NAME = "iTerm" ]]; then
	FILE=$(osascript -e 'tell application"iTerm"to activate' -e 'tell application"iTerm"to set thefile to choose folder with prompt"Choose a folder to place received files in"' -e "do shell script (\"echo \"&(quoted form of POSIX path of thefile as Unicode text)&\"\")")
else
	FILE=$(osascript -e 'tell application "iTerm2" to activate' -e 'tell application "iTerm2" to set thefile to choose folder with prompt "Choose a folder to place received files in"' -e "do shell script (\"echo \"&(quoted form of POSIX path of thefile as Unicode text)&\"\")")
fi

if [[ $FILE = "" ]]; then
	echo Cancelled.
	# Send ZModem cancel
	echo -e \\x18\\x18\\x18\\x18\\x18
	sleep 1
	echo
	echo \# Cancelled transfer
else
	cd "$FILE"
	/usr/local/bin/rz --rename --escape --binary --bufsize 4096
	sleep 1
	echo
	echo
	echo \# Sent \-\> $FILE
fi
或者在 / usr/loal/bin 目录下创建两个文件(可选)
cd /usr/local/bin
wget https://raw.githubusercontent.com/RobberPhex/iterm2-zmodem/master/iterm2-recv-zmodem.sh
wget https://raw.githubusercontent.com/RobberPhex/iterm2-zmodem/master/iterm2-send-zmodem.sh
赋予这两个文件可执行权限
chmod 777 /usr/local/bin/iterm2-*
设置 Iterm2 的 Tirgger 特性
配置好配置文件之后,开始对 iTerm2 进行配置
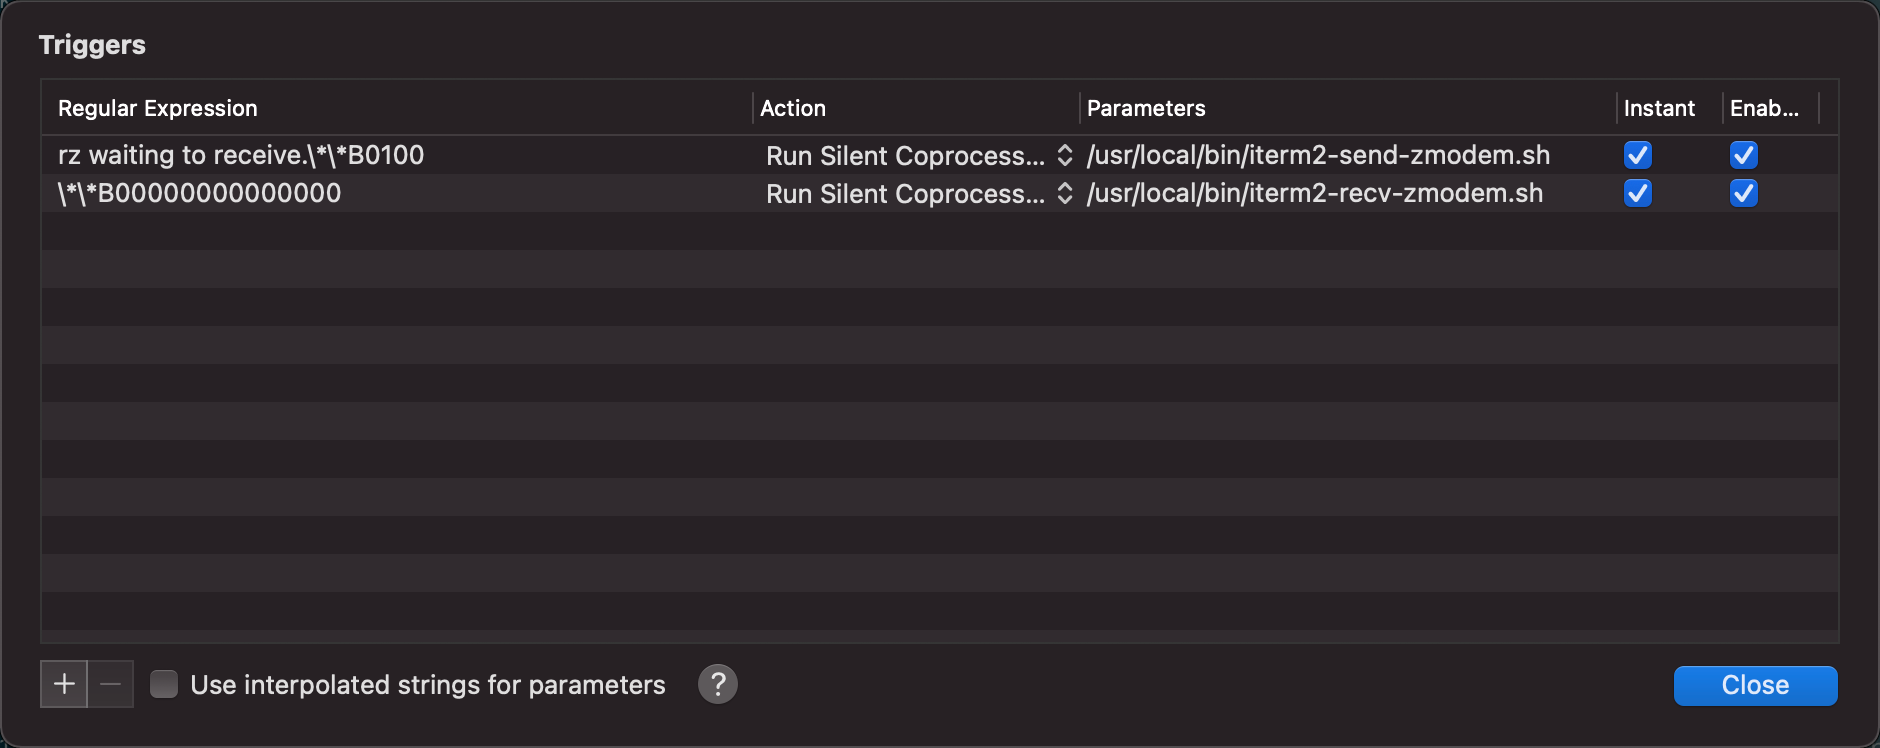
点击 iTerm2 的设置界面 Perference-> Profiles -> Default -> Advanced -> Triggers 的 Edit 按钮,加入以下配置
添加两条 trigger,分别设置 Regular expression,Action,Parameters,Instant 如下:

Regular expression: rz waiting to receive.\*\*B0100
Action: Run Silent Coprocess
Parameters: /usr/local/bin/iterm2-send-zmodem.sh
Instant: checked

Regular expression: \*\*B00000000000000
Action: Run Silent Coprocess
Parameters: /usr/local/bin/iterm2-recv-zmodem.sh
Instant: checked
使用 rz 和 sz
注意客户端也要安装 lrzsz
rz 上传功能
在 bash 中,也就是 iTerm2 终端输入 rz 就会弹出文件选择框,选择文件 choose 就开始上传,会上传到当前目录
rz 中的 r 意为 received(接收),告诉客户端,我(服务器)要接收文件 received by cilent,就等同于客户端在上传。
sz 下载功能
sz fileName(你要下载的文件的名字) 回车,会弹出窗体 我们选择要保存的地方即可。
sz 中的 s 意为 send(发送),告诉客户端,我(服务器)要发送文件 send to cilent,就等同于客户端在下载。
sz 用法:
下载一个文件
sz filename

下载多个文件
sz filename1 filename2

下载 dir 目录下的所有文件,不包含 dir 下的文件夹
sz dir/*
rz 用法:
输入 rz 回车后,会出现文件选择对话框,选择需要上传文件,一次可以指定多个文件,上传到服务器的路径为当前执行 rz 命令的目录。
-b 以二进制方式,默认为文本方式。(Binary (tell it like it is) file transfer override.)
-e 对所有控制字符转义。(Force sender to escape all control characters; normally XON, XOFF, DLE, CR-@-CR, and Ctrl-X are escaped.)
如果要保证上传的文件内容在服务器端保存之后与原始文件一致,最好同时设置这两个标志,如下所示方式使用:
rz -be
rz 与 sz 只适合小的文件传输,大文件还是使用 Filezilla 与 xftp 等工具进行传输;
只能传输文件,而不能传输文件夹;
不是所有工具都支持 rz 与 sz,必须支持 ZModem 协议才行,例如 putty 不能使用 rz 与 sz。
注意事项
登录服务器时,不要使用expect脚本登录,要直接使用ssh命令登录,否则会失效!
